A pair of dull scissors usually gives itself away fast – it folds gift wrap instead of cutting it, chews through paper, or slips on fabric when you need a clean line. If you are looking for how to sharpen household scissors safely, the first thing to know is that not every pair should be treated the same way. A basic kitchen or utility pair can often be touched up at home. A high-quality pair, a sentimental pair, or scissors with damaged blades usually deserve more careful handling.
For most households, the goal is not to grind away metal and hope for the best. It is to restore a usable edge without hurting yourself, ruining the blade angle, or shortening the life of the scissors. That means choosing a method that matches the condition of the tool and knowing when to stop.
Before you sharpen, check the scissors
Start with a quick inspection. Many scissors feel dull when the real issue is dirt, adhesive buildup, or a loose pivot. Wipe the blades with warm soapy water, dry them fully, and remove any sticky residue carefully. Then open and close the scissors a few times. If the blades wobble or no longer meet cleanly, sharpening alone may not fix the problem.
Look closely at the edge under good light. If you see chips, bent tips, deep nicks, or obvious corrosion, home sharpening can make things worse. Those flaws usually need more controlled work. For a basic household pair that is simply losing its bite, a light touch-up is often enough.
How to sharpen household scissors safely at home
The safest home method for most people is a sharpening stone made for fine edge work. It gives you more control than improvised tricks and is less likely to remove too much metal. If you already keep a stone around for household tools, this is the one to use.
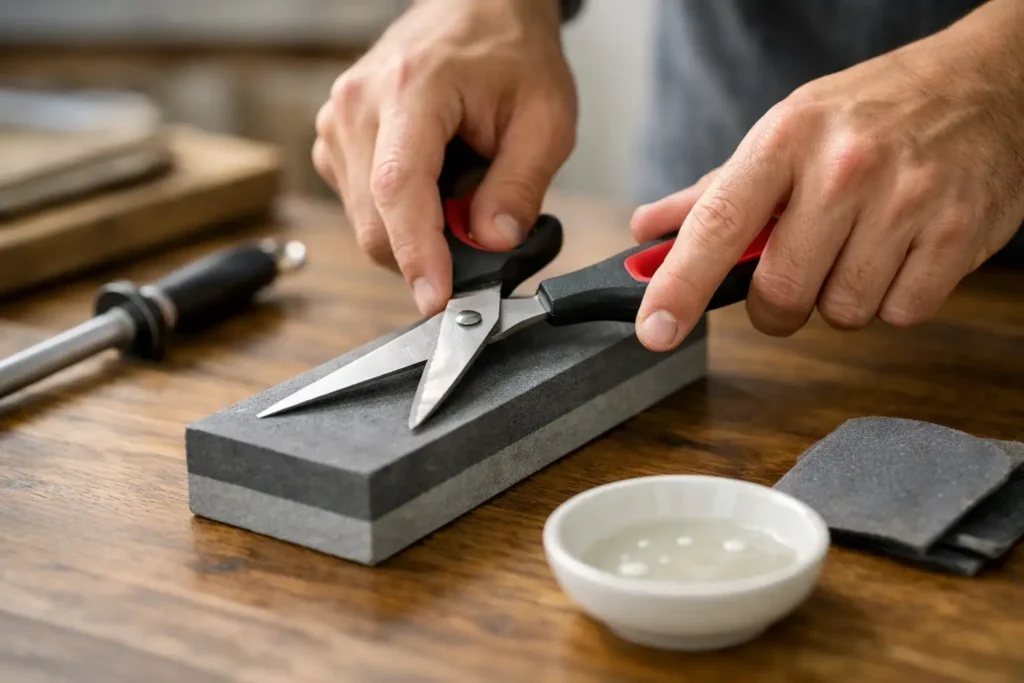
Use a sharpening stone with a light touch
Open the scissors as far as they will comfortably go. If the scissors can be taken apart safely and reassembled correctly, that can make the job easier, but many household pairs should be left assembled. Hold the blade so the beveled edge lies flat against the stone. That factory bevel matters. If you change the angle, the scissors may feel sharper at first but cut worse afterward.
Move the blade across the stone from the pivot toward the tip, following the bevel in one smooth motion. Use light, even pressure. A handful of passes is usually enough before you check progress. Then repeat on the other blade if both edges are beveled. Keep your fingers clear of the cutting path and work on a steady surface that will not slide.
Once the edge is touched up, wipe away any fine metal filings and test the scissors on scrap paper. If they cut cleanly without folding the paper, stop there. More sharpening is not always better.
A ceramic rod can work for quick touch-ups
If the scissors are only slightly dull, a ceramic honing rod may help refresh the edge. This is more of a maintenance option than a full sharpening fix. You still need to match the bevel and use gentle strokes from pivot to tip.
The advantage here is control. The trade-off is speed. A rod is not the right choice for badly worn scissors, and it will not correct damage or alignment issues.
Methods people try that need caution
You have probably heard the old advice about cutting aluminum foil or sandpaper. These methods get talked about because they are easy, not because they are the most reliable.
Cutting folded aluminum foil may remove tiny burrs or give a temporary improvement on lightly worn blades, but it does not sharpen in a precise way. If the edge is actually dull, the results are usually limited. Fine sandpaper can do more, but it is also easier to overdo. You are still abrading the edge, just with less control than a stone.
If you try either method, think of it as a minor touch-up for inexpensive utility scissors, not a cure-all. Test carefully afterward. If the cut is still rough, forcing more passes often just wears the blades down.
Safety matters more than speed
A lot of sharpening accidents happen because people rush. Household scissors feel familiar, so it is easy to get casual around them. The safer approach is simple: stabilize the tool, work slowly, and keep your off hand out of the blade path.
Good lighting helps more than people expect. So does a dry work surface. If your hands are wet, greasy, or tired, wait until later. Small slips happen fast when you are trying to hold an awkward angle.
It also helps to sharpen only enough to restore performance. Aggressive grinding removes life from the scissors. That matters if you have a pair you use often in the kitchen, craft room, garage, or garden shed.
When home sharpening is a bad idea
Some scissors should not be DIY projects. If the blades have a complex edge, a very fine tip, or visible damage, home methods can leave you with a tool that cuts worse than before. The same goes for scissors that were expensive to begin with or have sentimental value you do not want to risk.
There is also the issue of alignment. Scissors do not cut well just because they are sharp. The two blades need to meet correctly along the edge. If the pivot is worn or the blades are slightly bent, sharpening the bevel alone will not solve the real problem.
For Seattle-area households trying to keep tools working longer, this is often the point where professional service makes more sense than experimenting. A skilled sharpening service can evaluate whether the issue is edge wear, blade geometry, tension, or damage, and that saves a good pair from ending up in the junk drawer.
How often should you sharpen household scissors?
It depends on what they cut and how they are stored. Scissors used on paper, packaging, tape, and general kitchen tasks will dull faster than a pair used lightly for occasional wrapping paper. Cutting tough materials, especially anything adhesive, wears the edge down and leaves residue behind.
A better habit than chasing a schedule is paying attention to performance. If the scissors start folding paper, snagging instead of slicing, or requiring extra force, check them before the problem gets worse. Light maintenance done at the right time is usually safer than waiting until the blades are badly worn.
Storage matters too. Tossing scissors loose into a crowded drawer can knock the edge around and stress the tips. Keeping them clean, dry, and separated from harder tools does more for edge life than most people realize.
A few common mistakes to avoid
The biggest mistake is sharpening the flat inside face of the blade. On most household scissors, that surface should stay flat. Removing metal there can ruin how the blades meet. Another common problem is using too much pressure. Heavy pressure feels productive, but it often scratches the blade and changes the angle.
People also keep sharpening when the real problem is grime or looseness at the pivot. If you clean the blades and tighten the joint slightly, you may get better cutting without touching the edge at all. And if the scissors are cheap, badly stamped, or already misshapen, there may be a point where replacement is more practical than repair.
If you want the safest result, know your limits
There is nothing wrong with handling simple upkeep at home. For a basic pair of household scissors with mild dullness, a careful touch-up can be enough. But safe sharpening is really about judgment. If you are unsure of the bevel, unsure of the blade condition, or unsure how much metal to remove, stopping early is the smart move.
That is where a local sharpening service earns its keep. A practical shop like Sharper Tools can help extend the life of everyday tools without the trial and error that often turns a fixable pair into a replacement problem. Sometimes the most cost-effective choice is not doing it yourself. It is getting the edge restored correctly the first time.
A sharp pair of scissors should feel predictable, clean, and easy to control. If yours are fighting every cut, treat that as a sign to slow down, check the tool carefully, and choose the method that protects both your hands and the scissors you rely on.