
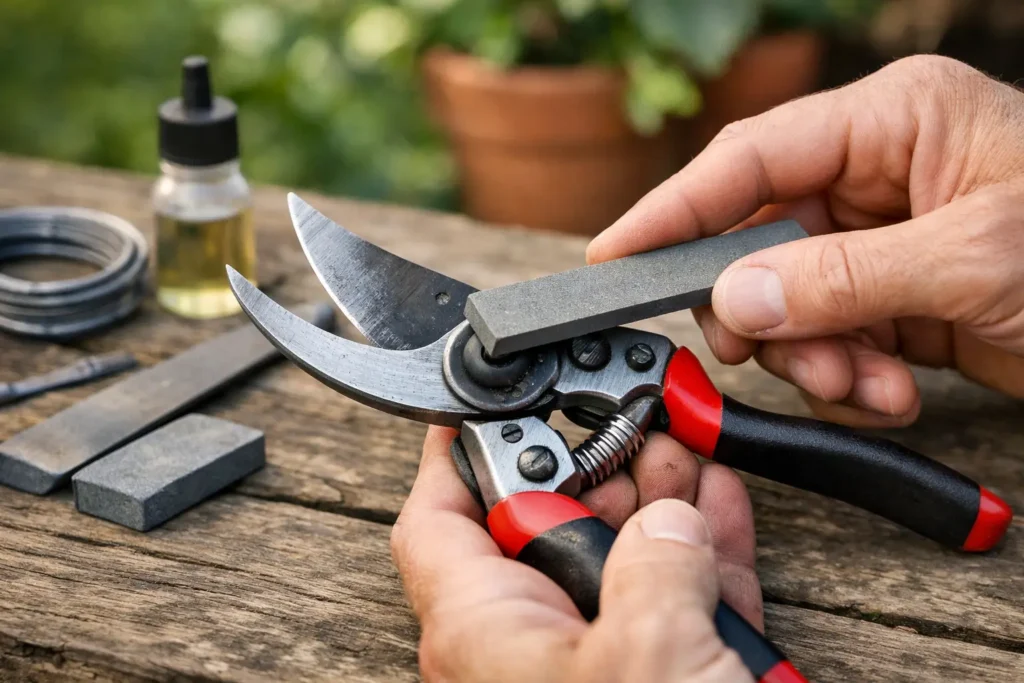
A pair of pruning shears should slice through a green stem with a clean, easy motion. If you are squeezing hard, crushing stems, or leaving ragged cuts that invite disease, the blades need attention. Learning how to sharpen pruning shears is a useful part of seasonal garden care, but the goal is not to make every edge razor sharp. The goal is to restore the original cutting bevel without changing the way the tool closes.
Good sharpening saves a quality pair of shears from the replacement bin and makes pruning safer for both you and the plant. It also takes less force, which matters when you have a full afternoon of roses, shrubs, fruit trees, or cleanup ahead.
Know What Kind of Pruning Shears You Have
Most hand pruners are either bypass or anvil style. Bypass shears have two curved blades that pass closely by each other, much like scissors. They are the usual choice for live stems because their clean cut is gentler on plant tissue. Anvil shears have one sharpened blade that closes onto a flat metal or plastic surface. They are often used on dry, woody growth.
The sharpening approach is slightly different. On bypass shears, sharpen only the outside beveled edge of the cutting blade. The inside surface needs to stay flat so it can pass tightly against the opposing blade. Filing that flat surface creates a gap, and a gap causes tearing instead of cutting.
On anvil shears, sharpen the beveled side of the cutting blade and preserve the angle already there. The anvil itself is not meant to become a knife edge. If it is gouged, cracked, or badly worn, sharpening alone will not restore a clean cut.
Before you begin, open and close the shears slowly. Look for a bent blade, loose center bolt, cracked handle, or a blade that does not meet its mate evenly. A dull but otherwise sound tool is a good sharpening candidate. A badly misaligned tool may need adjustment, replacement parts, or professional service first.
What You Need Before You Start
You do not need a bench full of equipment. For most household pruning shears, gather these four items:
- A small flat file, diamond hand file, or sharpening stone suited to curved edges
- A stiff brush or old toothbrush, plus a rag
- Warm soapy water or a garden-tool cleaner
- Light machine oil or a blade-safe lubricant
Work gloves are helpful when cleaning and handling the blades, although you may want to remove the glove from your filing hand for better control. If the shears can be safely taken apart and you are comfortable reassembling them, a screwdriver or wrench may also help. Disassembly is optional for routine touch-ups. It is useful when sap, soil, and rust have built up around the pivot.
Avoid powered grinding wheels unless you have experience with tool sharpening. They remove metal quickly, can overheat a thin blade, and make it easy to erase the factory bevel. A hand file is slower by design, which gives you more control.
How to Sharpen Pruning Shears Step by Step
1. Clean the blades first
Sap and dried soil can make a blade feel dull even when the edge is still in decent shape. Scrub the blades, pivot area, and spring with warm soapy water. For sticky residue, use a small amount of solvent made for tool cleanup, then wipe the surface dry.
Seattle-area gardeners should be especially mindful of moisture. Tools left in a damp shed or on a wet potting bench can develop light rust quickly. Fine surface rust can often be rubbed away with a nonaggressive abrasive pad or fine steel wool, followed by a thorough wipe-down. Deep pitting near the cutting edge is different: it may leave gaps in the cut and can require more careful restoration.
2. Find the original bevel
Hold the open shears under a bright light and tilt the cutting blade until the angled edge catches the light. That narrow angled strip is the bevel. Your file needs to follow that existing angle, which is commonly around 20 to 30 degrees but varies by manufacturer.
Do not guess by holding the file nearly flat against the blade. That will widen the bevel and weaken the edge. Do not make it overly steep either, because a blunt angle will not bite into stems well. Matching what is already there is more reliable than chasing a specific number.
3. File in one controlled direction
Secure the shears on a stable work surface, with the blade safely positioned away from your body. Set the file on the beveled edge and make smooth strokes from the pivot area toward the tip. Follow the curve of the blade rather than filing straight across it.
Use light, even pressure on the forward stroke. Lift the file before returning it to the starting point instead of sawing back and forth. A few passes may be enough for regular maintenance. If there is a nick in the edge, it will take longer, but patience is better than aggressive filing.
Check your progress every several strokes. You want a consistent, clean line along the bevel, not a wide shiny strip. Keep the tip intact. It is easy to round it off by spending too much time there, and that makes it harder to make precise cuts in tight growth.
4. Remove the burr carefully
As you file the beveled side, a tiny wire edge called a burr may form on the flat inside of the blade. This is normal. Lay a fine stone nearly flat against that inside surface and make one or two very light passes to remove the burr.
The word “flat” matters here. You are not sharpening the inside of a bypass blade. You are only clearing the burr while preserving the flat mating surface. If you see yourself creating a new bevel on that side, stop and reset the stone flatter.
5. Clean, oil, and adjust
Wipe away all metal filings. Add a drop of light oil at the pivot, spring, and any moving joints, then open and close the shears several times. Wipe off excess oil so it does not collect dirt.
Finally, test the center bolt. The blades should move smoothly without wobbling. If the shears are loose, tighten the bolt a little at a time and test after each adjustment. Too loose and stems can fold between the blades. Too tight and the action becomes tiring while the blades may bind.
Test the Edge on the Right Material
A clean test cut on a fresh, pencil-thin stem is more useful than shaving paper. Pruning shears are designed to cut plant material, and a paper test can be misleading because curved blades do not behave like a straight knife.
Make a few cuts in live, small-diameter growth. The cut should be crisp, with no obvious crush marks or stringy fibers. If the shears cut well near the pivot but struggle near the tip, the blade may be unevenly sharpened, the tip may be damaged, or the blades may not be aligned correctly. If they catch or pinch at every point, check pivot tension and blade alignment before filing more metal away.
For anvil shears, test on dry twigs within the tool’s rated cutting capacity. Pushing any hand pruner through wood that is too thick strains the pivot and can chip the edge, no matter how carefully it was sharpened.
Common Mistakes That Shorten Tool Life
The most common mistake is sharpening both sides of a bypass blade. That changes the close fit between the blades and usually creates more problems than it solves. Another is filing without cleaning first, which drags grit across the edge and hides damage.
Over-sharpening is also a real issue. If a few careful strokes restore cutting performance, stop. Removing extra metal does not make the tool better, and repeated heavy sharpening shortens blade life. A light touch-up once or twice a season is usually easier on the tool than waiting until it is badly dull.
Do not forget the rest of the shears. A sharp blade cannot overcome a loose bolt, rusty spring, or sticky pivot. Cleaning and lubrication are part of edge maintenance, not an optional finishing step.
When Professional Sharpening Makes More Sense
Home touch-ups work well for ordinary dullness. Professional sharpening is the better call when blades are chipped, deeply rusted, bent, heavily pitted, or no longer meeting properly. It is also a practical choice if you have several garden tools to maintain before spring or fall cleanup and would rather spend the weekend in the yard than at the workbench.
A trained sharpener can restore the bevel while checking alignment, hardware, and overall blade condition. For Seattle customers, Sharper Tools can help keep frequently used pruners and other everyday cutting tools ready for the work that matters.
After sharpening, wipe your shears dry before storing them, add a light coat of oil, and keep them somewhere protected from rain and condensation. That small habit means your next pruning job can start with a clean cut instead of a frustrating one.