A shovel that bounces off compacted soil, pruners that crush stems, and hedge shears that chew instead of slice all point to the same problem – a dull edge. If you have been wondering how to sharpen garden tools without wasting time or damaging them, the good news is that most yard tools respond well to a simple, steady approach.
Sharp tools make garden work faster, cleaner, and safer. They also reduce strain on your hands and wrists, which matters whether you are trimming backyard shrubs in Seattle or maintaining tools for regular landscape work. The trick is knowing which tools need a fine edge, which only need a durable working bevel, and when it makes more sense to stop and let a sharpening service handle it.
Why sharpening garden tools matters
A lot of people keep using dull tools because they still sort of work. That is usually when damage starts. Dull pruners can tear live plant tissue, making clean healing harder for the plant. Dull hoes and shovels require more force, which wears you out sooner and puts more stress on the tool.
There is also a tool-life issue. When an edge is neglected for too long, you usually need to remove more metal later to bring it back. Regular touch-ups are easier on the tool than waiting until the edge is rounded over, chipped, or rusted.
For homeowners, sharpening means less frustration on weekend projects. For professionals, it means more predictable results and fewer slowdowns in the middle of a job.
What you need before you start
You do not need a complicated setup to sharpen most garden tools. In many cases, a mill file, a sharpening stone, a wire brush, a rag, and a little lubricating oil are enough. A bench vise helps keep the tool stable, and work gloves plus eye protection are worth having.
The biggest mistake is grabbing the wrong abrasive and grinding too aggressively. Power tools can remove metal very quickly and overheat an edge if used carelessly. For many hand tools, manual sharpening gives you better control.
Before sharpening, clean the tool first. Brush off packed dirt, wipe away sap, and remove surface rust. A dirty edge is harder to read, and you may end up filing unevenly because you cannot clearly see the bevel.
How to sharpen garden tools by tool type
Not every garden tool should be sharpened the same way. That is where many DIY attempts go sideways. A bypass pruner needs a different finish than a shovel, and hedge shears are different from both.
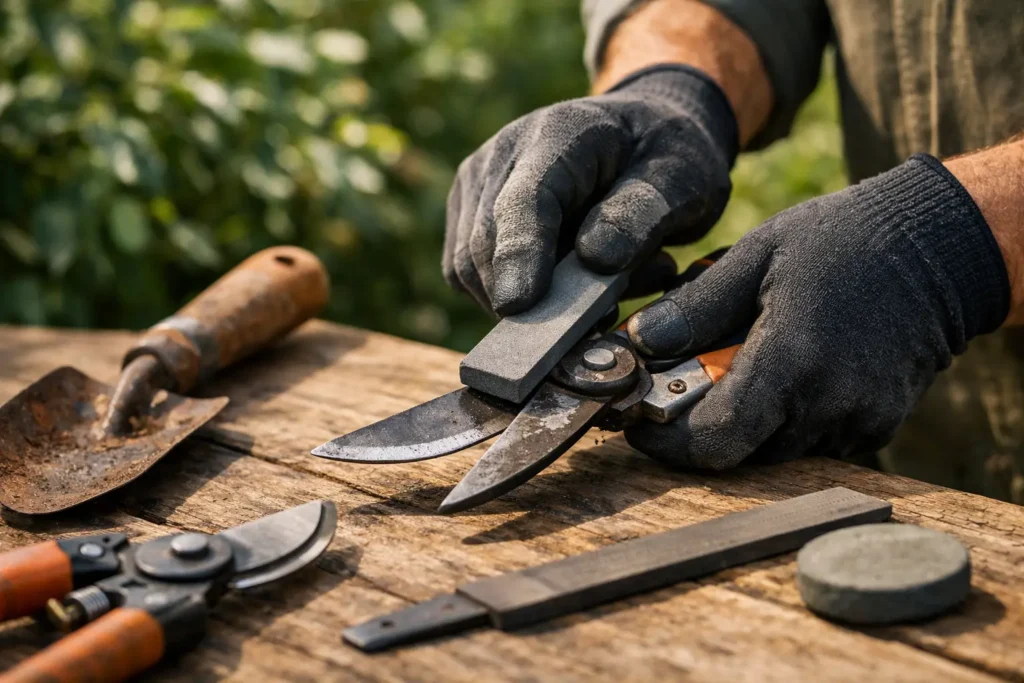
Pruners and loppers
Bypass pruners and loppers should be sharpened on the beveled side only. Follow the existing angle rather than trying to create a new one. In most cases, a few smooth passes with a file or stone are enough. Work from the base of the blade toward the tip, keeping steady contact with the bevel.
Once the beveled side is sharp, lightly remove any burr from the flat side with one or two gentle passes. Do not grind away at the flat side or you can ruin the cutting action. These tools are designed to pass closely by each other, and changing that geometry can lead to poor cuts.
If the blade has nicks, rust pitting near the edge, or looseness in the pivot, sharpening alone may not fix the problem. Sometimes the tool also needs adjustment, cleaning, and lubrication before it performs properly again.
Hedge shears
Hedge shears need a clean, even edge, but not a razor finish. File along the existing bevel on each blade using long, controlled strokes. Try to keep both blades balanced so one side does not end up noticeably different from the other.
After sharpening, wipe the blades clean and add a light coat of oil at the pivot and along the steel. If the shears still bind or spread apart while cutting, check for loose hardware before assuming the edge is the issue.
Shovels, spades, and edging tools
Digging tools benefit from a durable working edge, not a knife edge. A mill file is usually the best choice here. Clamp the tool securely, then file the front bevel evenly across the blade. You are looking for a thinner, cleaner edge that penetrates soil more easily, not something delicate enough to roll over on the first rock.
For tools used in rough ground, a slightly less refined edge often lasts longer. That is one of those it-depends situations. If you mainly work in softer beds, you can go a bit finer. If your soil is rocky or full of roots, durability matters more than sharpness alone.
Hoes and weeders
Hoes work best when the edge is straight, consistent, and suited to the job. A draw hoe can take a more pronounced edge for slicing weeds, while a heavier grub hoe should stay more robust. Keep the angle even and remove only what is needed to restore the edge.
This is another category where over-sharpening can backfire. A very thin edge may feel great for a few minutes, then chip or fold once it hits compacted ground.
The safest sharpening process
If you want a repeatable method, keep it simple. Secure the tool so it cannot move. Identify the existing bevel. File or stone in one direction with controlled pressure, checking your progress often. When the edge feels consistent and any major dull spots are gone, stop.
That last part matters. More sharpening is not always better. Every pass removes metal, and the goal is maintenance, not reshaping for the sake of it.
After sharpening, wipe away filings and apply a light coat of oil to protect the steel. On moving tools like pruners, loppers, and shears, lubricate the pivot area too. A sharp edge on a stiff, dirty tool still feels like a poor tool in use.
Common mistakes when sharpening garden tools
The most common issue is changing the factory angle without meaning to. Once that happens, the tool may cut worse even though the edge feels sharp to the touch. Staying with the original bevel is usually the safest move.
The second mistake is using powered grinding equipment too aggressively. Heat buildup can affect edge performance, and uneven grinding can shorten tool life. Unless you have experience, files and stones are slower but more forgiving.
Another problem is ignoring the rest of the tool. Bent blades, loose fasteners, rust around pivots, and sap buildup can all affect performance. Sharpening is part of maintenance, not the whole job.
How often should you sharpen garden tools?
That depends on use, storage, and the type of work you do. A homeowner who clips a few shrubs and edges a bed now and then may only need occasional touch-ups. A landscaper or avid gardener using the same tools every week will notice edge loss much sooner.
As a general rule, sharpen before the tool becomes frustrating. If pruners start crushing instead of slicing, or a shovel takes noticeably more effort to enter the soil, that is your cue. Light, regular upkeep is easier than restoring a badly neglected edge.
Storage matters too. Tools left damp or dirty in a shed tend to dull and corrode faster than tools cleaned after use and kept dry.
When to sharpen them yourself and when to hand them off
If the tool is in decent shape and only mildly dull, DIY sharpening is practical for many homeowners. It is a useful skill, especially for basic upkeep between more thorough services.
If the edge is chipped, badly worn, rusted, or out of alignment, professional sharpening is often the better value. The same goes for people who simply do not want to spend part of their weekend filing steel in the garage. A proper service can restore the edge, clean up the tool, and help you avoid removing too much metal by guesswork.
For Seattle-area customers, Sharper Tools handles garden tool sharpening with the kind of practical attention that keeps equipment working longer instead of ending up replaced too soon. That local convenience matters when you have a pile of tools that all need attention at once.
A sharper tool is easier on you and better for the job
Learning how to sharpen garden tools is really about making everyday work go more smoothly. Clean cuts are better for plants, sharp digging edges save effort, and regular maintenance stretches the life of tools you already own. If you want to handle touch-ups yourself, keep the process controlled and conservative. If the tool needs more than a light tune-up, getting it professionally sharpened can save time, preserve the tool, and get you back outside with gear that works the way it should.